Wednesday, July 30, 2008

Chicken Satay Skewers and Strawberry Mushroom Salad


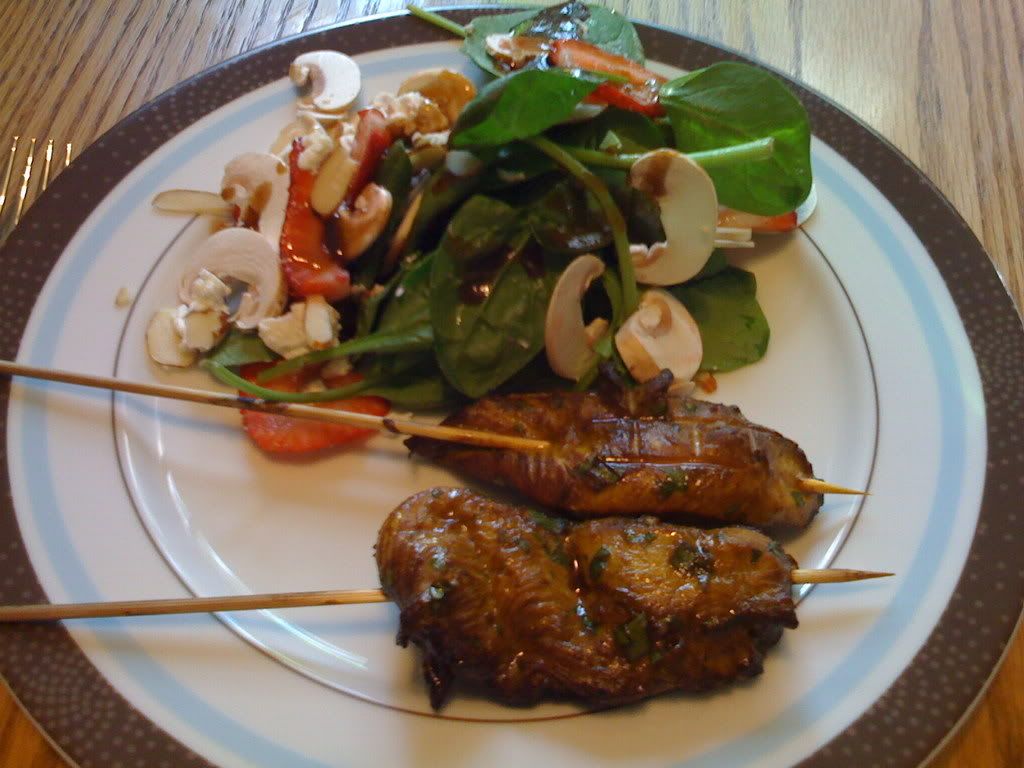
Last night I tried out the Satay Skewers from Good things Catered.
They were really yummy...however beware 'Curry Nail' *

*Curry nail occurs when you submerge your hands in anything with curry. They will turn yellow. I instantly panicked because not 2 hours before I just got my gel nails done and now they were a hideous shade of yellow. I ran to the bathroom and grabbed my nail polish remover and it came right off. Whew, crisis averted.

You can visit the link above to see the recipe for Satay Skewers, because her pictures are much nicer. I will however share my recipe for the Strawberry and Mushroom Salad.


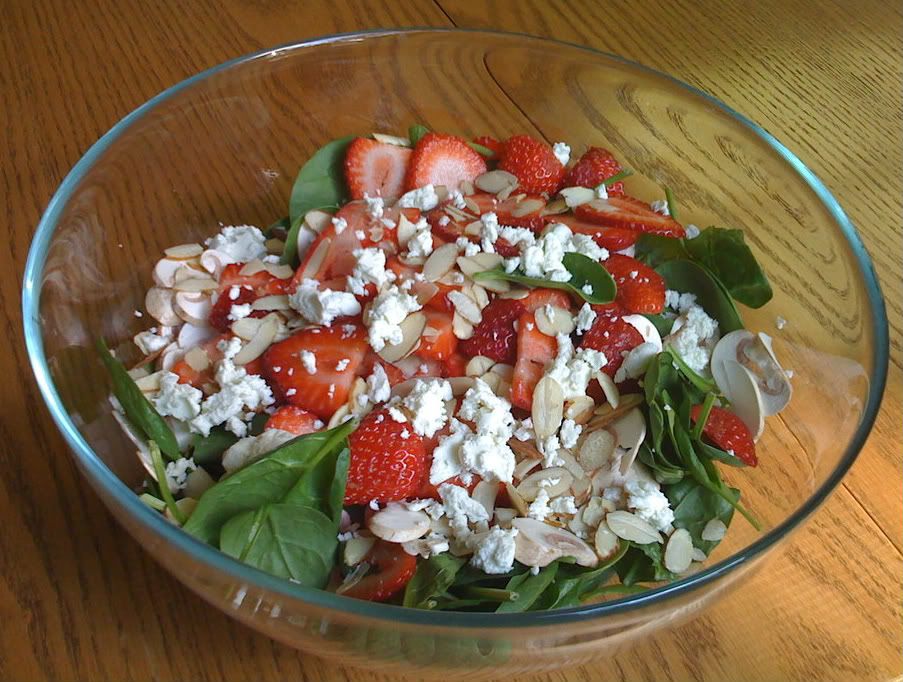
As I may have mentioned before, I'm an 'avant garde' kinda chef...I don't really measure things, I like to experiment. I got the recipe from my BFF when I went to visit her last summer.

You'll need:

Spinach
Goat Cheese
7-10 Strawberries
7-10 Mushrooms
Sliced almonds or whatever nuts/seeds you have lying around

Dressing
Balsamic vinegar
Olive oil
Brown Sugar
Clove of garlic (minced or put through a garlic press)
Pinch of salt

The quantity of everything depends solely on how many people you are serving. I go by 'parts' for the dressing - one part balsamic, two parts brown sugar and three parts oil. If it's just the hubby and me for dinner I'll usually use the 1/4 cup and measure everything out and it usually is more than enough. Recently I've started using less oil because I just love the taste of balsamic vinegar and also it was making way too much dressing for the two of us. So I have been doing 1/4 cup balsamic, 1/2 cup of brown sugar and 1/2 cup oil.

Now that you have decided how much you will need, throw all of the dressing ingredients in a blender (because I am wayyyyy to lazy to whisk it) and blend it until its...well...blended.

The salad is a very visual thing for me. You have to eyeball it and think about who is going to be eating it and approximate how much they'll eat. I put about 3/4 of a bag of spinach in a bowl (I use bagged spinach because I have not had much success with washing/drying spinach, plus as aformentioned, I'm lazy) and then I cut up the mushrooms, and strawberries and throw it on top.

I then sprinkle on sliced almonds usually...if I don't have any almonds, I've used pine nuts and flax seeds. Really, anything goes for the nuts/seeds portion of the salad. I imagine pumpkin seeds (especially toasted ones) would be fabulous. Again for the quantity, just put in as much as your little heart desires. There's no magic formula and it's not rocket science. It's a salad. If you really want to know how much, I will just grab a handful and sprinkle it around the bowl. That should be enough.

Lastly crumble the goat cheese on top. You can use a fork to scrape the cheese away so it crumbles nicely, or as I recently discovered, use your hands. Using your hands is fun because then you get to lick your fingers! How much do you like goat cheese? If you love it, then pile it on. The more the better. If you're so/so on goat cheese, then just sprinkle enough to cover the top. It really adds a nice flavor once you add the dressing.

When it comes to the dressing, I like to keep it seperate and pour it on once I've 'dished up'. There's nothing worse than having too much dressing or soggy salad. Spinach is particularly prone to sogginess.

This salad is fantastic as a main course when you add some grilled chicken or - my favorite - Beer Butt Chicken (recipe coming soon).

Sunday, July 27, 2008

Chocolate Cupcakes with Cream Cheese Frosting


*NOTE* Please excuse the crappy photography. These were test photos done with my new iphone. If you read my First Post you would know what happened to my actual camera. C-Dub is hiding his camera from me and my obsessive need to photograph the food.

This cupcake recipe comes from my Granny. She's been making it for years and everyone in the family loves it. I wanted to make something nice for my brother's girlfriend for her birthday, so I made these yummy treats and I plan on bringing them to her work tomorrow.

Granny's Chocolate Cupcakes (or cakes)
as instructed by Granny via email

2/3 cup shortening (at room temperature)
1 2/3 cups sugar
3 eggs
2 1/4 cups cake & pastry flour
2/3 cup cocoa
1/4 teasp. baking powder
1 1/4 teasp. baking soda
1 teasp. salt
1 1/3 cups water
1 teasp. vanilla
Cream shortening and sugar together, add eggs and beat well. Add vanilla. Sift together all dry ingredients and add alternately with water to creamed mixture. Bake in 9" layer pans (2) or makes about 20 cup cakes. Bake at 350 deg. - cakes approx 35 mins., cup cakes approx 20 mins. Be sure to oil cake pans well and cover bottom with circle of wax paper. Let cakes cool in pans for several minutes before removing to wire rack.

N.B. I squeeze the batter into 2 8" pans, then when cooled cut each layer throught the middle using either a piece of thread wound around my fingers or a long bread knife. I then put the four layers together with whipped cream made as chocolatey as you want by adding chocolate ice cream sauce to taste. Our favorite birthday cake - there is no talking when we are eating this.


Cream Cheese Frosting
from Cupcake Bakeshop

12 ounces or 1-1/2 packages of Philly cream cheese
1/2 stick butter
4 cups sifted powdered sugar
1 teaspoon vanilla

1. Bring cheese and butter to room temperature by letting it sit out for 1 or 2 hours
2. Sift powdered sugar into a bowl or onto parchment
3. Beat butter and cheese at medium speed until creamy
4. Add half of the sugar and the vanilla. Beat until combined
5. Gradually add remaining sugar (more if you have to) until you get to the consistency and sweetness you like

NOTE: The frosting naturally has a beige-ish color, and since I was putting it on chocolate cupcakes I wanted it to look as yummy as it tasted. I added a bit of cocoa for color and a bit of taste. I didn't measure so you can go ahead and add as much or as little as you like. I got it to a nice mocha shade and decided it would be a nice contrast to the dark cupcakes.

Chocolate Curls
from The Pioneer Woman

Ree does an excellent job of describing this process so I will not interfere with her genius. Click the link above to visit her site for a great pictorial.

Grab some Crisco and some semi-sweet baking chocolate. (Any brand will do, and you can even use semi-sweet chocolate chips if you’d like!)

Place three ounces (usually three squares) of chocolate into a microwave-safe bowl.

Now place one tablespoon of Crisco (vegetable shortening) into the bowl.

Now throw it in the microwave for 30 to 45 seconds, or until the shortening is melted and hot.

With a fork, mash up the chocolate to blend with the melted Crisco.

Stir to combine thoroughly.

Now, grab a metal cookie sheet, turn it upside down, and pour the melted chocolate on.

Then, with a flat spatula (or heck, a knife), spread the chocolate in a thin layer…

Keep going until it’s very, very thin. Then…and this is the key…stick it in the freezer for a few minutes.

Be sure to give it the ol’ fingerprint test. And when it’s ready, it should leave the slightest mark, but not an actual depression.

Next, get a somewhat sharp-edged spatula and begin to scrape the chocolate from the bottom of the pan. When the chocolate is just the right temperature, it’ll curl instead of break

Now you have a couple of minutes before the chocolate gets too soft.

So just scrape along the bottom of the pan…

…And the chocolate will curl right up. If it’s too hard, give it a minute, then try again. If it gets too soft, stick it back in the freezer for a minute.


choc pie creamed spinach pizza crust 048

Pretty soon you’ll have a bunch of fun little chocolate curls.

Important: as soon as possible, transfer the curls to a cold pan or plate, then stick them in the freezer to harden. Store in the freezer in a Ziploc bag until you need them. Use them to adorn pies, cakes, or platters of fruit. You’ll feel instantly fancy!

Pizza Time!


**Did I mention I need a new camera?**

Today I was feeling rather lethargic and could not decide what to make for dinner. There was talk of hamburgers...but that didn't really appeal to me today. Instead I came across a yummy recipe for Carmelized Onion and Goat Cheese Pizza at Good Eats 'n Sweet Treats. Being the goat cheese whore that I am, I got really excited as I read this recipe (yah, I'm a dork.) and decided to experiment and make a half/half pizza to share with the hubby. I made 1/2 the pizza in this recipe and the other half was my own re-creation of a pizza served at Earl's Restaurant.

At Earl's it's called the 'California Pizza', simply - basil pesto as the sauce, and for the topping I use sundried tomatoes, shrimp and goat cheese. Once it's out of the oven I like to squeeze some lemon juice on it. Mmmmmm, etc.

I'm not really one for measuring, either. I mean, seriously, it's a pizza, do what feels good! I love goat cheese and sundried tomatoes so I put lots on my side and not as much on hubby's side.

The final verdict
Hubby said the onion pizza needs meat. He's a man so I really can't blame him... plus I agree so I think I will add some grilled chicken next time.

Both sides were fantastic however I had some trouble with the crust, I baked the pizza on our new pizza stone (thanks Mr&Mrs W!)...the underside part of the crust did not bake/harden. I tried leaving it in the oven a bit longer but the side crust got darker as well as the toppings so I had to just take it out. It was still good I just wished it was a bit crispier.

Saturday, July 26, 2008

Strawberry Cupcakes


These cupcakes were the first project with my new mixer, and I made them to bring to the hubby's birthday dinner at my brother's house. They turned out pretty well, however they seemed to have more of a muffin consistency (more dense) than that of a cupcake. I'm new to this baking thing so I'm not sure what I did wrong...maybe baked them a bit too long or the temp wasn't right. See, I have a schizophrenic oven and setting it at 350F doesn't necessarily mean that's the actual oven temperature. I find it runs a bit hot so I try to set the temp at about 25-40 degrees lower than the recipe calls for. It's not an exact science, and it's annoying. I can't wait until we can replace the darn thing.

The cupcakes were very yummy and the cream cheese frosting was a nice touch. Everyone loved them, in fact I'm sure we all had more than one!

The original recipe was posted at Good Things Catered.

Ingredients:
2 1/2 c. cake flour
1 tsp baking soda
1/4 tsp salt
1/2 c. unsalted butter
1 1/2 c. sugar (or a little less)
2 eggs
1/3 c. buttermilk
1/4 c. oil
1 tsp vanilla extract
2 c. chopped strawberries

Directions:
-Preheat oven to 350 degrees and prepare 2 cupcake pans.
-Sift flour, salt, and baking soda in medium bowl.
-In bowl of mixer, cream butter and sugar until fluffy.
-Add eggs one at a time until combined.
-Add buttermilk, oil and vanilla until combined.
-Add flour mixture and stir until just combined.
-Fold in berries.
-Fill cupcake pans 3/4 way.
-Bake for 20 minutes.

Frosting
1/4 c. strawberries
1 Tbsp. strawberry liqueur (I used Baja Rosa - strawberry tequila)
1/2 tsp lemon juice
8 oz. cream cheese, room temp
1 1/2 sticks unsalted butter, room temp
1 3/4 c. powdered sugar
1/2 Tbsp vanilla

-Put berries, liquor, and juice in saucepan.
-Bring to a boil over medium heat and then reduce to a simmer for 5 mins.
-Let cool then blend until smooth.
-In bowl of mixer mix cream cheese and butter until creamy.
-Add sugar, then vanilla.
-Add berry puree until smooth.
-Frost cupcakes when they are completely cooled.

Sunday, July 6, 2008

1st Post!

I've wanted to start a blog for a long time, but never knew what to write about. Well now that I'm married and don't have a wedding to plan for, I seriously need a hobby. I thought I would try my hand at a few things, namely crafting, photography and baking/cooking.

My camera is broken at the moment unfortunately...had a little run-in with Pele, the Hawaiian fire goddess, whilst visiting Mt. Kilauea at Volcanoes National Park. I tripped on lava and the camera saved me from being impaled by sharp rock. It's supposed to be shock proof, but I guess landing on the camera does not constitute a 'shock'. Actually come to think of it, the fall wasn't what ruined the camera. It was when I took the camera snorkeling (it's waterproof). When I fell, the rock dented a tiny area on the opening for the battery chamber, thus compromising the waterproof seal. I wonder if the warranty will cover that...well I'll try anyway! I am going to keep my fingers crossed that they will just give me a credit to buy a new one and I can put that money towards a slick SLR camera. Hey, a girl can dream.


A very generous friend gave us (ok, me) a fantastic wedding gift last night - a brand new KitchenAid Mixer. That's right girlies, drool away. I never thought I would actually own one of these for two reasons: 1. My cooking skills aren't good enough to warrant a fancy mixer and 2. I could not afford said fancy mixer. So, now I will make Mr. & Mrs. D proud by honing my domestic skillzzzz.